Saturday, November 19, 2011


·         ⅔ cup white rice flour
·         ⅔ cup brown rice flour
·         5 Tbsp (¼ cup + 1 Tbsp) potato starch
·         5 Tbsp (¼ cup + 1 Tbsp) tapioca flour
·         2 Tbsp cornstarch
·         1 tsp xanthan gum
·         1 ½ tsp GF baking powder
·         ½ tsp baking soda
·         ¼ tsp salt
·         ¼ tsp ground cinnamon
·         ⅛ tsp ground nutmeg
·         2 eggs, beaten
·         1 ½ cups mashed ripe banana (5 medium)
·         1 cup sugar
·         ½ cup cooking oil or melted butter
·         ¼ cup chopped walnuts (optional)
·         1 recipe Streusel-Nut Topping (optional)

1.      Preheat oven to 350°F. Grease and "GF oat flour" bottom and ½ inch up the sides of one 9x5x3-inch or two 7½x3½x2-inch loaf pans; set aside. In a large bowl combine white rice flour, brown rice flour, potato starch, tapioca flour, cornstarch, xanthan gum, baking powder, baking soda, salt, cinnamon, and nutmeg. Make a well in center of flour mixture; set aside.
2.      In a medium bowl combine eggs, banana, sugar, and oil. Add egg mixture all at once to flour mixture. Stir just until moistened (batter should be lumpy). Fold in walnuts. Spoon batter into prepared pan(s). If desired, sprinkle Streusel-Nut Topping over batter in pan(s).
3.      Bake for 55 to 60 minutes for 9x5x3-inch pan or 40 to 45 minutes for 7½x3½x2-inch pans or until a wooden toothpick inserted near center comes out clean (if necessary, cover loosely with foil the last 15 minutes of baking to prevent overbrowning). Cool in pan on a wire rack for 10 minutes. Remove from pan. Cool completely on rack. Wrap; store overnight before slicing.

Streusel-Nut Topping: In a small bowl combine ¼ cup packed brown sugar and 3 tablespoons rice flour. Using a pastry blender, cut in 2 tablespoons butter until mixture resembles coarse crumbs. Stir in ⅓ cup chopped walnuts.

*Adapted from “Better Homes and Gardens New Cook Book: Celebrating the Promise Limited 14th Edition”, 2007, Banana Bread, Pg. 130


·         1 Cup White Rice Flour
·         1 Cup Brown Rice Flour
·         ½ cup Potato Starch
·         ½ cup Tapioca Flour
·         cup Cornstarch
·         1 Tbsp Xanthan Gum
·         3 Tbsp Brown Sugar
·         1 ½ tsp Salt
·         1 pkg of Active Dry Yeast (Slightly less than 1 Tbsp)
·         1 ¾ Cup Milk
·         4 Tbsp Butter
·         3 eggs slightly beaten
·         1 tsp GF oat flour (used to flour pan)

Combine dry ingredients (including yeast)
Warm 1 ¾ Cup Milk and 4 Tbsp Butter to 125° F
Mix milk and butter with dry ingredients and add 3 eggs
Beat with mixer for about 3 or 4 min.
Spray large bread pan with oil and sprinkle with GF oat flour
Pour mixture into the large bread pan
Let rise for 40 min.
Bake for 45-50 min. at 350° F (cover with foil if getting too dark)

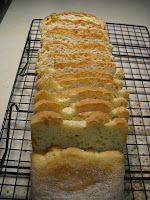
So, my mom came up with this recipe. (Thanks Mom!) The kids love it 'cause it tastes closer to white "Wonder" bread than my GF bread recipe. 


Friday, April 29, 2011

Seven-Layer Pasta Salad


My mom made this for me once and I love it!  Now I make it all the time.  This is a Betty Crocker recipe. My changes are asterisked at the bottom of the recipe. 

Seven-Layer Holiday Pasta Salad (Betty Crocker)
Prep: 30 min. Cook 15 min. Chill: 8 hrs

·         *2 C uncooked farfalle (bow-tie) pasta (4 ounces)
·         2 C broccoli flowerets
·         *2 medium tomatoes, chopped (1 ½ C)
·         1 medium yellow bell pepper, chopped (1 C)
·         *1/3 C diced red onion
·         1 C mayonnaise or salad dressing
·         ½ C plain yoghurt
·         2 Tbsp sugar
·         ½ tsp curry powder
·         1 ½ C shredded Cheddar chess (6 ounces)
·         *1 Tbsp Betty Crocker Bac~Os
o   Bacon flavor bits or chips
·         *2 Tbsp finely chopped fresh parsley

1.      Cook and drain pasta as directed on package. Place broccoli in boiling water. Cover and cook 1  minute; drain. Immediately rinse with cold water; drain.
2.      While pasta is cooking, layer tomatoes, broccoli, bell pepper and onion in 2-quart glass serving bowl.
3.      Mix mayonnaise, yoghurt, sugar and curry powder in medium bowl. Stir in pasta. Layer pasta evenly over onion in serving bowl.
4.      Sprinkle with cheese. Top with bacon bits and parsley. Cover and refrigerate at least 8 hours before serving but no longer that 24 hours. 8 servings.

*I use any GF pasta I have on hand (shell, rotini, elbow, etc.)
*I use only one tomato
*Sometimes, I use ¼ C green onions instead of the red onion
*I cook my own bacon and chop it into bits 
*I sprinkle dried parsley on top


Gluten Free Bread


Gluten Free Bread

·         1 C white rice flour
·         2/3 C brown rice flour
·         1 C GF oat flour
·         2/3 C potato starch
·         2 Tbsp brown sugar
·         1 ¼ tsp salt (or ¾ tsp salt w/salted butter)
·         2 Tbsp corn starch
·         1 tsp xanthan gum
·         1 package active dry yeast (2 ¼ tsp)
o   Heat liquids to 110°-115° F if putting yeast straight into liquid; 120°-130° F if mixing yeast with dry ingredients first; or 80° F for bread machine
·         1 ¾ C milk
·         4 Tbsp unsalted butter, melted
·         2 eggs slightly beaten

Mix dry ingredients together in heavy duty mixer (including yeast). Heat milk to 125° F. Pour milk and butter into dry ingredients and slightly mix. Add eggs. Beat on high for 3 min. Grease and oat flour 2 bread pans (4.5 x 8.5in 1.5qt). Pour half of mixture into one bread pan. Pour the other half into another bread pan. Let rise for 40-50 min. Bake at 375° F for 30 min. until brown and hollow sounding (cover with foil if crust is becoming too dark). Turn baked bread onto rack and cool completely. Slice, wrap, and store in freezer. Best eaten slightly warmed or toasted.

~Curtis & Kelsey Allred 


Finally!  After many experiments, we came up with a delicious, cheap, simple, gluten-free bread!  My husband and I eat it so fast that we just store it in the fridge. To get oat flour, we buy GF oats and blend them in a blender. To get the rice flour, we buy rice and grind it in a grain grinder. If you have any other tips on saving money, please let us know! :D 


Wednesday, December 8, 2010

Oatmeal


Ingredients:
  • 1/4 Cup GF oats
  • 1/4 Cup applesauce
  • 1/2 Cup water
  • dash of salt
  • 1/4 tsp cinnamon
Instructions:
  1. Mix all ingredients in a microwavable bowl
  2. Heat in microwave for 3 min. stirring occasionally
  3. Let cool and serve 
* I like to add a bit of brown sugar to mine right before I eat it

Commentary:

Before I went gluten-free, I hated oatmeal.  Even as a baby, I would spit it out. Something happened though. Perhaps it was my body's way of saying 'no more Rice Chex for breakfast.' Whatever the reason, one day I decided I wanted apple crisp for breakfast.  I didn't want to take the time to make it though.  So, I grabbed my GF oats and followed the instructions on the back, with a few minor changes.  To make it more like apple crisp, I added applesauce and cinnamon.  And now, I love oatmeal. Hopefully this recipe will add variety to your breakfast and teach you to crave oatmeal too.

Pumpkin Pie Squares


Pumpkin filling

Ingredients:

·         1 Pie Pumpkin
·         1 1/3 Cup sweet condensed milk (one 14 oz can)
·         1 egg
·         1 ¼ tsp cinnamon
·         ½ tsp nutmeg
·         ½ tsp ginger powder
·         ¼ tsp ground cloves
·         1 Cup hot water


Instructions:

1.       Heat oven to 350° F
2.       Cut pumpkin in half without the stem
3.       Scoop out the seeds and strings
4.       Place pumpkin halves cut-side down on foil lined baking sheets
5.       Cover with foil
6.       Bake at 350° F until tender (about 2 hours)
7.       Cool
8.       Scoop out flesh and beat in a heavy duty mixer on high until smooth
*a potato masher or food processor could also be used
9.       Drain if too watery
10.   Beat together just until smooth; 1 1/3 Cup smooth pumpkin, sweet condensed milk, egg, cinnamon, nutmeg, ginger, cloves, and hot water
11.   Pour into a greased 9x13 inch baking pan
12.   Bake at 375°F for 55-65 minutes
*center will still move slightly
13.   Take out of oven and cool slightly
14.   Using a rubber spatula, scrape pumpkin filling onto the GF pumpkin squares crust (see recipe below)
15.   Smooth it out evenly
16.   Bake for another 2-5 minutes, just to slightly brown the top of the pumpkin filling and make it look more presentable
17.   Refrigerate until cold
18.   Spread whipped cream (see recipe below) on top and serve cold

GF Pumpkin Squares Crust

Ingredients:

·         2 Cups rice flour
·         1/3 Cup almond flour
·         2/3 Cup potato starch
·         ½ Cup GF oats
·         ½ Cup brown sugar
·         ½ Cup butter, softened

Instructions:

1.       Mix rice flour, almond flour, and potato starch in a bowl
2.       Combine 1 Cup of this mixture with the oats, sugar and butter
3.       Press into an ungreased 9x13 inch baking pan
4.       Bake at 350°F for 10-15 min.
5.       Let cool


Whipped Cream

Ingredients:

·         About 2 Cups heavy whipping cream
·         Sugar
·         Vanilla


Instructions:

1.       Beat about 2 Cups of heavy whipping cream with a mixer until cream is fluffy and peaks form
2.       Fold in about ¼ Cup sugar and 1 tsp vanilla
3.       Fold in more sugar and vanilla to taste
4.       Keep cold

Commentary: 

This last September, I was craving pumpkin pie so bad.  I went to the stores to try and find the canned pumpkin filling but couldn't find any.  Apparently pumpkin season doesn't arrive until October. Anyway, you can imagine what I did when I finally saw pie pumpkins at the store.

I had never made a pie from scratch before, but luckily, the pie pumpkin I bought had a recipe attached to the pumpkin.  The recipe was great except for the 'put smooth pumpkin in pie shell' part. To fix this, I thought pumpkin squares might be easier to make GF.  So, I looked on the internet and found the general instructions for pumpkin squares crust. Of course I had to substitute the wheat flour for rice flour and and some starch, but I also decided to include almond flour because I thought that sounded good.

The next part is easy, right?  'Pour smooth pumpkin mixture into shell and bake for an hour.'  This actually didn't work out so well.  The crust ended up burning.  So, I tried cooking the pumpkin filling by itself for 30 min. and then adding it to the crust to finish cooking.  The crust still burned.  The only thing that really ended up working was cooking the pumpkin filling by itself for the full amount of time and then adding it on top of the crust. The pumpkin squares didn't look very appetizing after that. So I smoothed the pumpkin all out and let it brown in the oven for a few min. Then, I added whipped cream on top. After that, no one knew the difference.

As a last note, I prefer the pumpkin squares after they've sat in the fridge for two days.  The sitting time makes the crust not as hard.

Celery Sticks

Ingredients:
  • celery
  • peanut butter
  • raisins
  • craisins (dried cranberries)
Instructions:
  1. Wash celery and blot dry
  2. Cut off bad ends
  3. Cut the rest of the celery into sticks about 5 inches long
  4. Scoop peanut butter into the celery canal so it is filled
  5. Add raisins or craisins or both on top of the peanut-butter 
  6. Serve as is 
Commentary:

Ok, I know what you're probably thinking.  'Celery Sticks? I don't need a recipe for this. Everyone has had a celery stick before.' This may be true, but sometime when you switch your diet, you forget about some of the things you can eat. 

Back when I was a single student at college, I really needed some good snacks.  My nice roommate decided to make me celery sticks to help out. Now, I had eaten these as a kid, but had kind of forgotten about them. At first I didn't want to eat them (I didn't much care for celery), but I tried them anyway.  They were delicious!  Her secret...craisins. They add a tart kick that complements the peanut butter. Because of her, I will now eat celery, and hopefully you will too.